Overview
The Pruvan Project Manager allows you to track and update the status for all of your current projects. There are a variety of tools available in the Project Manager to assist you such as search, sort, update, import, export, item count, photo upload, sharing, and photo download. Projects listed in the Project Manager are known as current projects. This is because once a project is deleted it is no longer available in the Project Manager, but all of the field data belonging to that project is still available in Pruvan's Cloud Storage on the Photos page. The Project Manager also lets you create and manage Work Types, click the link to learn more. Below is a quick look at the layout of the Project Manager.
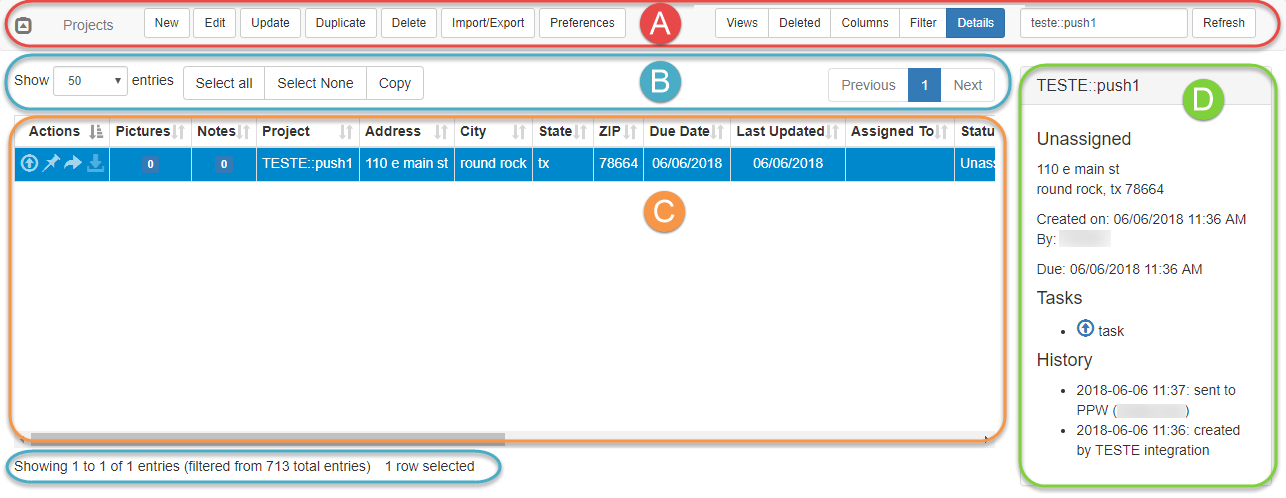
A. Project Manager Sub Menu
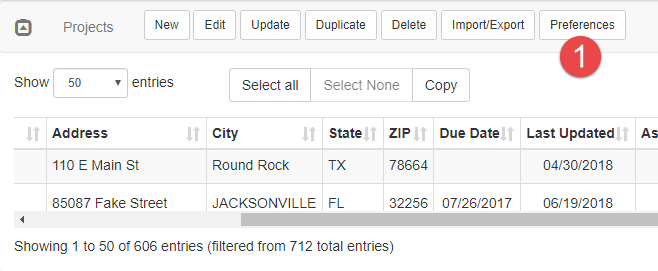
This menu contains most of the tools available in the Project Manager:
- New - This button brings up the new project window. You can create a new project or create a new Work Type with it.
- Edit - This button brings up the edit project window, and only works when a single project is selected from the current project table. In this window you can change all updatable fields and tasks for the selected project.
- Update - This button allows you to update the Status, Assigned To, Due Date, and Work Type of all selected projects.
- Duplicate - This button allows you to duplicate selected projects.
- Delete - This button will delete all selected projects.
- Refresh Integration - This menu / button will refresh the selected integration, bringing in any new projects.
- Import / Export - This brings up a window that allows you to import and export projects to / from a spreadsheet file, such as a .xlsx or .csv.
- Preferences - This brings up the preference window. This allows you to set your preferences for the Project Manager, such as field color coding.
- Views - This allows you to save and apply filter and search settings to quickly return to complex project searches.
- Deleted - Clicking this button will show all of (and only) the previously deleted projects and allow you to restore them.
- Columns - This button allows you to show or hide columns from the Project table. Click Reset Columns to reset to the default view.
- Filters - This button will show / hide column filters in the Project Table. Filters will remain active even when hidden. The Filter button will remain blue as long as there are active filters applied.
- Details - Clicking this button will open the Details sidebar, showing all available details for the selected project.
- Search - The current project table will only show projects that match the value entered in to this field. All table fields are searchable.
- Refresh - The current project table does not automatically refresh when projects are imported or updated from an integration. Clicking this refresh button will show any changes since the last time the Project Manager was loaded.
B. Navigation Sub Menu
This menu bar contains the normal navigation, selection, and export tools available throughout Pruvan Online.
C. Current Project Table
This table shows you all of your current projects, and can be filtered based on your selections in the Project Manager Sub Menu. Clicking on the column header allows you to sort the projects listed by that column, either ascending or descending alphanumerically. You can also save the applied filters and searches to a View for searches that are repeated frequently.
- Actions - These icons give you access to additional tools for the listed project:
- Upload Photos - This brings up the Upload Photos tool.
- Activate Project - An active project will show up in the active project list in Pruvan's Cloud Storage.
- Share - This brings up the Project Sharing tool.
- Download Photos - This will download all available field data to a zip file.
- Print- Print the details for the selected Project(s).
- Route - Create a driving route for the selected projects.
- Pictures - This is a current count of field data in Pruvan's Cloud Storage for this project; pictures, surveys, and check ins. Clicking on it will open the Pruvan Cloud Storage Project Details page in a new tab / window.
- Notes - A count of the number of notes for the project, including applicable property notes. Hovering will display the 5 most recent notes, while clicking will open the notes editor.
- Cost Total - This is the total of all Cost fields in your project's Lines.
- Price Total - This is the total of all Price fields in your project's Lines.
- Client / Integration Code - This is the Client or Integration code for the project. If the project was not imported from an outside system, it will be blank. Hidden by default.
- Project - This is the project number.
- Coordinator - This field is used to assign a user (with a staff or higher role) to manage the project. This field is only visible in the Project Manager.
- Assigned To - This is the field user's username, from your account, that the project is assigned to.
- Status - This is Pruvan's project status.
- Field Status - This is the status from the last Pruvan Mobile device that took action on this project:
- Viewed - The project details have been opened in Pruvan Mobile
- In Progress - Field data collection has begun
- Complete - The field user has marked the project complete
- Accepted - The field user has accepted the project (requires use of project options)
- Rejected - The field user has rejected the project (requires use of project options)
- Blank - No action has been taken on the project in Pruvan Mobile
- Client Status - This is the status in your client's system (if applicable). Hidden by default.
- Due Date - This is the date that your field user should complete work by.
- Client Due Date - This is the date that your client requires project completion by. Hidden by default.
- Start Date - This is the date that the project will become workable. Pruvan Mobile users will not be able to work projects before their start date.
- Address Fields - The Street address, City, State, and Zip Code of the project property.
- Invoice - Shows invoice status if configured.
- Reference - This field is for you to identify a reference for the project, such as your client name or other identifying information. This field is only visible in Pruvan Online. Hidden by default.
- Description - This field is for you to provide context to the type of project, such as the work type. This field is only visible in Pruvan Online. Hidden by default.
- Project ID - This is a unique value for this instance of the project. A unique instance means that if you create a project with project number 'abcd', then delete the project, and create a new project 'abcd'; those two projects will have different Project IDs. Hidden by default.
- Created - The date and time this project instance was created. Hidden by default.
- Last Updated - The date and time this project instance was last updated (by a user or by the Pruvan system). Hidden by default.
D. Details Sidebar
This window shows you all available project information for the selected project. To open it, select a project and then click the Details button in the Project Manager Sub Menu. Select different projects or use the arrow keys to change what project's information is displayed. In addition to the information available on the current project table you will see the following fields:
- Project Instructions - Any instructions in the Project Instructions field will display here, any HTML will display as it would in Pruvan Mobile
- Task List - This shows the names of all the project's photo and survey tasks, with links to start new surveys and upload photos
- History - This window shows a log of the last 10 changes to the project; when it was changed, what was changed, and who made the change.
- Notes - This is a list of all project notes and applicable property notes. Click the edit button to open the notes editor.
Project Management
This outlines the general project flow through Pruvan and includes best practices for each phase. There is no one way to use Pruvan and the best way to use it is that which makes your process easier and more efficient.
Create
Creating your projects is the first step. A Pruvan project is a container that lets you collect field data in an organized fashion. Projects also contain information useful to the field user, such as the project's address and instructions. Projects contain tasks, and tasks provide a mechanism to collect data from the field; there are photo tasks and survey tasks. Only tasks that are applicable to the current project should be added, as opposed to adding all tasks to every project. This makes it clear to the field user what needs to be accomplished. Work Types can be used to create a template of project options and tasks that are commonly used together and can be quickly applied to new projects. You can use the Coordinator field to show which staff member is responsible for the project. Keep projects unassigned until they are ready to be worked, or use the Start Date field. This reduces confusion on the field user by keeping the project list in Pruvan Mobile uncluttered. The Client Due Date field can be used for you to track when projects must be completed. Projects can be created many different ways:
- The Project Manager - Create projects using the Project Manger in Pruvan Online
- Pruvan Mobile - Create projects using the + button in Pruvan Mobile
- Spreadsheets - Use the Import tool to quickly add projects from a spreadsheet
- Integrations - Use one of our integrations to pull in projects from another system
- Hot Links - Create Hot Links to send to your field users that create, and open, projects in Pruvan Mobile
Assign
Assign your project to the appropriate field user when it is ready to be worked. A field user is simply a username on your account that you or another person logs in to with the Pruvan Mobile app. You can create users in Pruvan for individual users or create group usernames that a team of people all log in with. On assignment the project will be available in that user's Pruvan Mobile project list. Use Pruvan's statuses to highlight urgency or special attention on an order. Rush can be used to identify a project that needs to be completed as soon as possible, while Rework is used when a project that's already been completed needs addition attention. Projects can be assigned by using:
- Project Manager - Use the Update tool to set the status and assignment of multiple projects at once
- Pruvan Mobile and Hotlinks - Projects created in Pruvan Mobile are automatically assigned to the user that created them
- Integrations - Internal integrations can auto-assign projects on import, while external integrations have the option of assigning all projects to a default user.
- Certain integrations can limit your assignment options. If you notice a user is grayed out and un-selectable then that user does not meet your client's assignment requirements. Please contact Pruvan Support to determine what needs to be done to assign the project to that user.
- Spreadsheet - Assignment can be set in spreadsheets on creation or as an update. Check out the Auto Assignment example in the spreadsheet management article.
Complete
After assignment the project is available in Pruvan Mobile. Once the field user has completed all of the necessary tasks, they should mark the project Complete. How this is done depends on your specific account setup and QA process. There are 3 different methods for conducting QA through Pruvan. These setups are documented under Pruvan Cloud Storage. The final step in all QA paths is to publish the results. This makes the field data available to those with access. That is:
- Client Portal - When the project has a client code the client is notified that the project is complete and the published data is available in the Client Portal
- Integrations - Integrations that support uploads will receive the field data. Check your specific integration's documentation for what, if any, field data they support through the integration
- Pruvan Downloader - All published field data will be immediately available to all of your running Pruvan Downloaders
Invoice
Invoicing can be completed through the Project Manager utilizing our invoicing features.
Close
Once everything is complete change the status of your project to Closed. This will remove it from the field users project list in Pruvan Mobile. This is the most commonly overlooked step in the Project life cycle. Skipping it causes the field user's project list in Pruvan Mobile to expand indefinitely, causing problems when using Pruvan Mobile. When utilizing the Invoiced status, closing projects can be delayed as invoiced projects are already removed from Pruvan Mobile. At any time the project can be re-opened in a Rework status if needed.
Project Manager Preferences
The Preferences button will open the Preferences menu containing settings that affect the display of the Project Manager. Here you can set the following options:
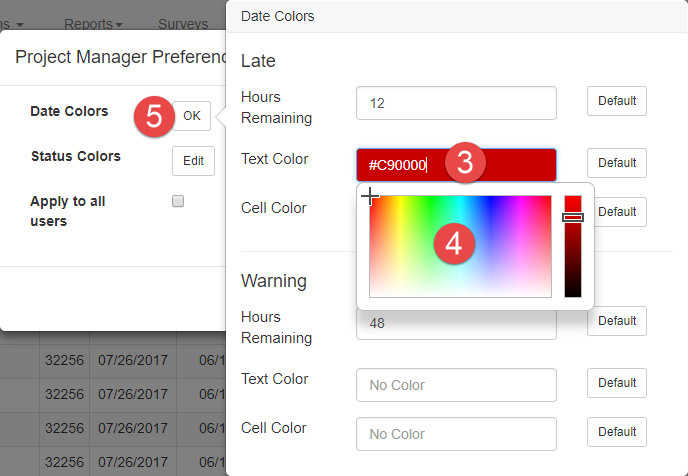
- Due Date Color: You can choose text and background color combinations for your Due Dates based on how soon the Due Date is. The 2 options are for Late and Warning. You can define how many hours out is considered a Warning or Late. Remember that when calculating hours that most of the Due Date's in Pruvan are set to 5pm. So a Warning set 48 hours out will not turn on the second day prior until after 5pm. If you would like to see the Warning the entire 2nd prior day, then a Warning setting of 60 hours would be more appropriate.
- Status Color: You can choose text and background color combinations for any of Pruvan's statuses. These will color the status fields in the Project Manager table.
- Apply to All Users: This Allows the Master account holder to apply their preferences too all users on their account creating a consistent display. Checked enables the override, while unchecked allows each user to have their own preferences.
Defaults
Every preference has a default setting, clicking the Default button will return the option to that setting. For example; Late Due Dates will be set to 0 hours with a white background and red text.
How to Change a Field Color
From the Project Manager screen:
- Click the Preferences button
- Click the Edit button for the type of field you would like to change (Status or Due Date)
- Go to the option you would like to change (Assigned, Rush, Late, etc.)
- Click in the text box to open the color picker for Text and / or Background Color
- Select the color you like or enter a hex code for your color (ie #000000 for black)
- To clear an entry simply delete the hex code from the text field
- Repeat 3-5 as necessary
- Click OK to close the pop up
- Click Save to save your changes

Views
Using the View tool you can save and apply filter, search, and display settings for the Project Manager screen. You can save different column layouts, searches for specific cities, filters for certain client codes, or any combination of them. The Project Manager will not remember any changes you've made to the table display (columns, filters, and searches) unless you save them. To save your regular view you can save over the Default view. To reset to the Pruvan default display, simply delete the Default view and reload the Project Manager. The Currently applied View will be highlighted in blue in the menu. ** Very important; this will NOT save a specific set of results (projects displayed). If projects have changed in a way that removes them from the search / filter settings then they will not be shown when the View is applied. **
How to Save a New View
From the Project Manager screen:
- Choose which columns you want displayed and order them appropriately
- Turn on the Filters and apply any filters desired
- Optionally, turn off the filters to hide the filter display
- Type any search values in to the search box
- When you're happy with your display; Click the Views button
- Click Create New
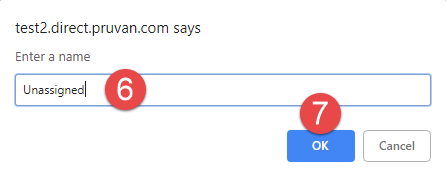
- Enter a name for your View, such as 'Unassigned Orders'
- Click Ok to save your View
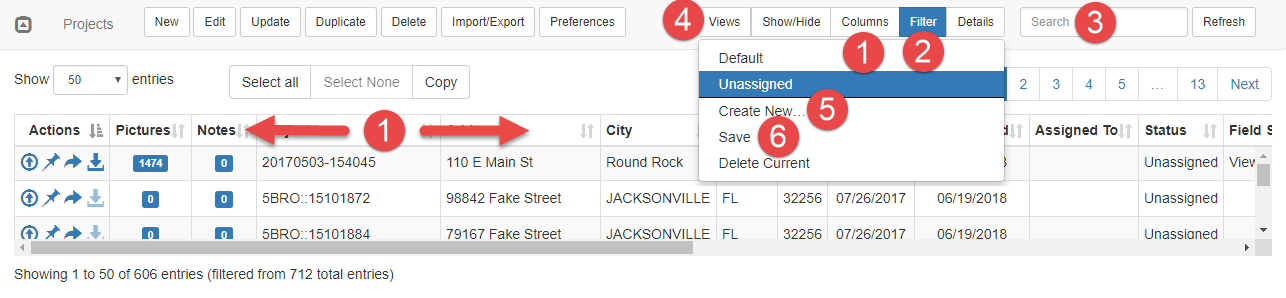
How to Apply a Saved View
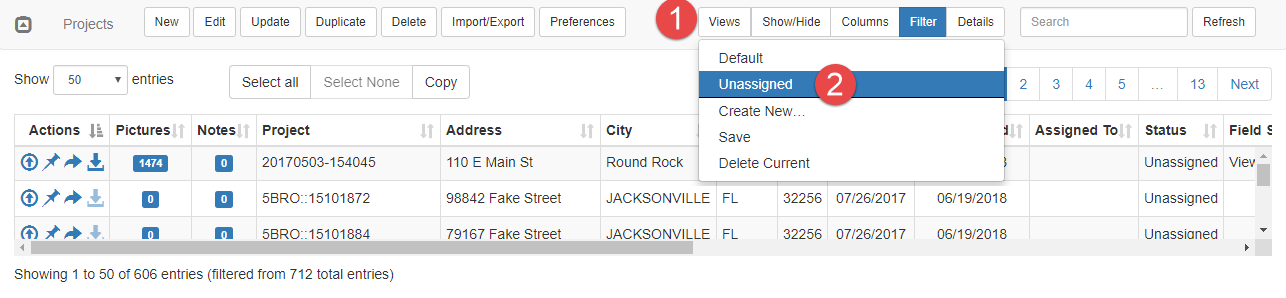
From the Project Manager screen:
- Click the Views button
- Select the View you would like to apply
How to Update an Existing View
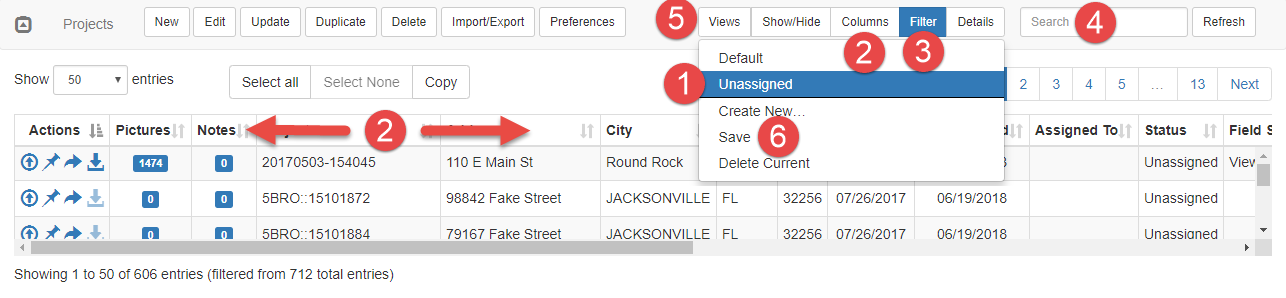
From the Project Manager screen:
- Apply the View you would like to update
- Choose which columns you want displayed and order them appropriately
- Turn on the Filters and apply any filters desired
- Optionally, turn off the filters to hide the filter display
- Type any search values in to the search box
- When you're happy with your display; Click the Views button
- Click Save
How to Delete a View
From the Project Manager screen:
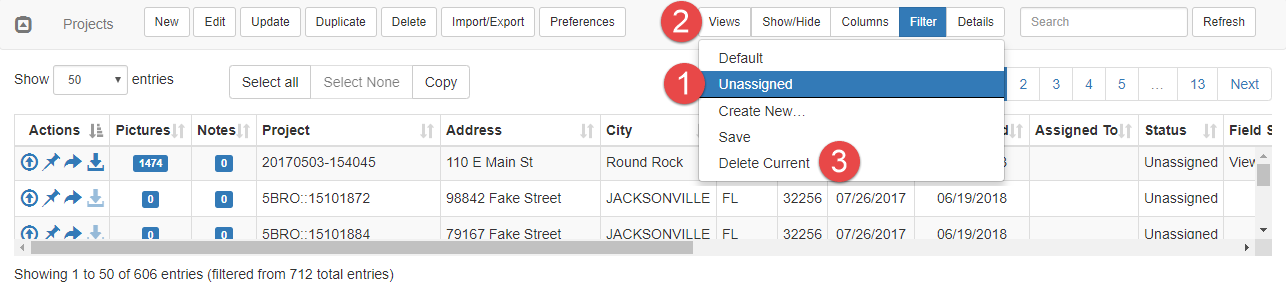
- Apply the View you want to delete
- Click the Views button
- Click Delete Current
Filters
Click the Filter button to narrow down your visible Projects. Available Filters will appear below the name of each Column. Enter or select your desired data to Filter the results. You can click the Filter button again to hide the visible Filters, but they will remain active. The Filter button will remain colored blue if you have active Filters.
Filtering by Date
When you click the Filter button, above the projects table you will see a list of Date columns visible on your current view (see image below). You can use these to filter these columns using a range of dates.

If you'd like to view a specific set range of dates, enter the start date and end date in the appropriate field. For example, if you'd like to view all of your orders with a due date in January 2021 you can select a start date of 01/01/2021 and an end date of 01/31/2021. If saved in a View, this filter would always display results from the month of January 2021.

If you would prefer to use relative dates to create your Filter, you can also type text in the date ranges. For example, you can view a list of all of your projects view yesterday, Today, and Tomorrow by typing "Yesterday" in the start date and "Tomorrow" in the end date. Alternatively you can type + or - along with a number of days. To view the same filters results as above you can type "-1 Days" as the Start Date and "+1 Days" for the end date.
These two filters are the same:


Relative Date Filters
When using Relative terms to filter your date results, this will always update at the time you are viewing the Project Manager page. A filter showing results for "Today" will always show the current date when you are looking at the project manager.
Other terms you can use for relative searching include:
- Name of Day (Monday, Tuesday, etc)
- Name of Month (January, February, etc)
- Relative terms (Today, Tomorrow, Yesterday)
- First/Last Day of (First Day of, Last Day Of)
- +/- Day/Week/Month (-1 Days, +3 Months, -2 Weeks, etc)
- Next/Last Day (Next Monday, Last Friday, etc)
- Day Next Week (Monday next week, Tuesday Next week, etc)
- "Friday Next Week" will always be the Friday of the following week on the calendar, while "Next Friday" is the next Friday on the calendar. Next Friday will be the following day on a Thursday, but Friday Next Week will show 8 days later on a Thursday.
Create a New Project
To create a new project using the Project Manager follow the steps listed in this article:
Edit Current Projects
You can edit most fields in a project by selecting the project and clicking the update button. These steps are listed in the below article. You can also use the Update tool to make quick changes to multiple projects at once. For those steps see the other article below.
- How to Edit a Project in Pruvan Mobile
- How to Mass Update Projects
- How to Add or Edit Tasks
- How to Add or Edit Notes
Duplicate Projects
Duplicating a project creates an exact copy of the project with a "__1" after it that auto-increments as you duplicate the same project again. Duplicating projects is pretty straightforward, select the projects you want to duplicate then click the Duplicate button.
Delete Projects
You can delete projects by selecting them and clicking Delete; steps below. When your Pruvan account is being synced to another system through an integration or a spreadsheet you can also delete projects by re-syncing the systems. With Integrations this is done by a Full Import, which will delete all projects from that integration that are not imported. When using a spreadsheet you can use the advanced option Delete Missing, which will delete all projects that are not imported. Deleted projects can be restored.
To delete projects with the Project Manager:
- Log in to Pruvan Online
- Click Projects
- Locate the project(s) you want to delete
- Select the project(s)
- Click Delete
- Verify the number of projects to be deleted
- Click Yes

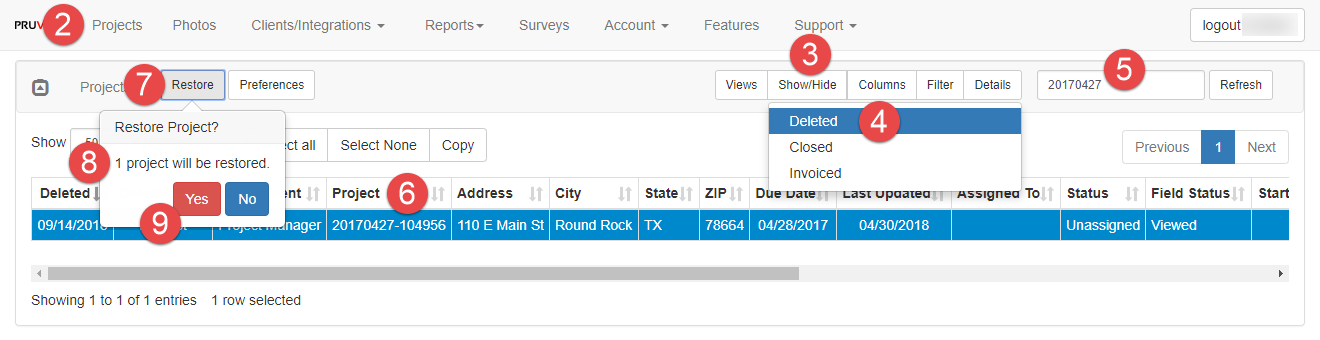
Restore Projects
You can restore deleted projects with the Project Manager. Restored projects will be created with the exact same values that they had at the time of deletion, including status and assignment. Projects can not be restored if another project already exists with the same Project Number. In this case you must deleted the active project before restoring a previous version.
To restore projects with the Project Manager:
- Log in to Pruvan Online
- Click Projects
- Click Deleted
- Locate the project(s) you want to restore
- Select the project(s)
- Click Restore
- Verify the number of projects to be restored
- Click Yes
Comments