1. Configure the SingleSource PPW Integration in Pruvan
- Click Integrations from the Menu
- Click New on the Integrations page
- Select SingleSource PPW as the Integration Type
- The Integration Label just need to be between 1 and 5 characters
- Enter a Customer if you would like
- Enter your SingleSource PPW username
- Enter your SingleSource PPW password
- Click the 'Validate' button
- This will result in the button turning green and reading 'Success' if the username and password are valid
- If you receive an error please verify that your credentials are valid by logging into PPW with them
- Set Integration Type to 'Contractor'
- More information on this is available in the PPW Integration FAQ
- Set the "Default Assign To" to your Pruvan username for auto assignment on import.
- Leave the Default Assign To as Unassigned if you would like to manually assign orders to your sub-users. Click Here for instructions on how to assign orders in Pruvan.
- Auto Admin will allow the SingleSource PPW system to update order information in Pruvan if left On.
- You can Turn Auto Admin Off if you would like to control the order statuses and instructions.
- There is no need to to enter anything in the Default Work Type field.
- Choose whether or not you would like your photos sent back to PPW
- Default is 'yes', change to 'no' if you do NOT want photos and other information to go back to PPW.
- Set 'Ignore Bid Tasks' to 'no'
- More information on this is available in the PPW Internal or External? article.
- Set Check In Required When Provider Set to 'Yes'
- This will turn on Check-In's in the Pruvan app so you can Check-In on all Work Orders in PPW that require a Check-In.
- Click the View Push Key button and select all of the text (ctrl-a / cmd-a), and copy it (ctrl-c / cmd-c)
- The Push Key will be needed during Section 3 of the integration set up process.
- Click 'Save'
2. Configure your SingleSource PPW APIv2 Integration in PPW
- Log in to your SingleSource PPW account
- Click on your username in the upper right corner
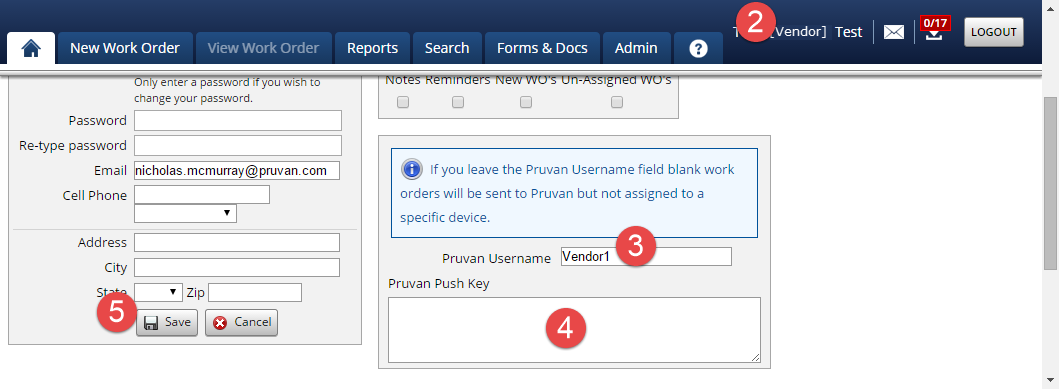
- Enter your Pruvan Username in the 'Pruvan username' field
- Paste the key you copied earlier into the 'Push Key' field
- Click the 'Save' button to the left
Comments